Custom Code Block Waijung 2 for ESP32
Waijung had several blogs that you could use. Also, the beginning of the year we have upgraded new blocks that allow you to work more versatility. If you want to do a custom block by yourself for your needs, you can do it as well because we have a Custom Code Block for you to custom as you want.
เดิมที Waijung มีบล็อกให้คุณใช้งานได้หลายบล็อก และเมื่อต้นปีเราได้อัพเกรดบล็อกใหม่ๆ เพิ่มเข้ามาให้คุณสามารถทำงานได้หลากหลายขึ้น แต่หากคุณต้องการจะ Custom บล็อกเองเพื่อตอบโจทย์การทำงานของคุณให้มากขึ้นก็สามารถทำได้ เพราะเรามี Custom Code Block ให้คุณสามารถ Custom ได้ตามต้องการ
Allow you to add any custom C code / library to the Simulink model. (Incase, there is no block yet.)
คุณสามารถเพิ่ม C Code หรือ Library ที่กำหนดเองลงใน Simulink ได้เอง (ในกรณีที่ไม่มีบล็อกๆ นั้น)
Custom Code Block User Guide
https://waijung2-doc.aimagin.com/basic-custom-code-block.html
When to use this block?
When you want to add your own custom C code to the system.
ใช้บล็อกนี้เมื่อไร?
เมื่อคุณต้องการเพิ่ม C Code ที่กำหนดเองลงในระบบ
How does this block work?
To use the Custom Code Block you need to complete the following steps.
บล็อกนี้ทำงานอย่างไร?
ทำตามขั้นตอนต่อไปนี้ เพื่อใช้งาน Custom Code Block
Step 1: Define input/output ports for the Block.
The number of ports equals the number of elements defined in the Input port definition (data type) separated by a comma e.g. double, single, double, uint8 and Output port definition (data type) separated by a comma e.g. double, single, double, uint8. The top port corresponds to the first defined data type.
Supported signal data types are a-i
ขั้นตอนที่ 1: กำหนดพอร์ตอินพุต/เอาต์พุตสำหรับบล็อก
จำนวนพอร์ตต้องเท่ากับจำนวนองค์ประกอบที่กำหนดไว้ในคำนิยามของพอร์ตอินพุต (ชนิดข้อมูล) แล้วคั่นด้วยเครื่องหมายจุลภาค เช่น double, single, double, uint8 และการกำหนดพอร์ตเอาต์พุต(ชนิดข้อมูล) ก็คั่นด้วยเครื่องหมายจุลภาคเช่นกัน เช่น double, single, double, uint8 พอร์ตบนสุดจะสอดคล้องกับชนิดข้อมูลที่กำหนดไว้ในครั้งแรก
ประเภทข้อมูลสัญญาณที่รองรับ คือ a-i
a.double
b.single
c.uint32
d.int32
e.uint16
f.int16
g.uint8
h.int8
i.boolean
Port labels can be defined in the Custom input/output port labels edit boxes i.e. "Custom input port labels (Ex. In1, In2, In3)" and "Custom output port labels (Ex. Out1, Out2, Out3)". Input and Output signals can be either scalar, vector, or 2-D matrix type. The dimensions of input signals are automatically inherited from the supplied input signals. The dimensions of output signals must be implicitly defined using the following format;
DataType : nRowsxnCols
For example : double:4x5,int8,int16:3x1.
If dimensions are not defined, a scalar signal (1x1) is assumed.
ป้ายพอร์ตสามารถกำหนดได้ในกล่องแก้ไขป้ายชื่อพอร์ตอินพุต/เอาต์พุตแบบกำหนดเอง เช่น "Custom input port labels (Ex. In1, In2, In3)" และ "Custom output port labels (Ex. Out1, Out2, Out3)" สัญญาณอินพุตและเอาต์พุตอาจเป็นประเภท scalar, vector หรือ 2-D matrix ก็ได้ ขนาดของสัญญาณอินพุตจะรับช่วงมาจากสัญญาณอินพุตที่ให้มาโดยอัตโนมัติ ขนาดของสัญญาณเอาต์พุตต้องกำหนดโดยปริยายโดยใช้รูปแบบต่อไปนี้
ประเภทข้อมูล : nRowsxnCols
ตัวอย่าง : double:4x5,int8,int16:3x1
หากไม่มีการกำหนด จะถือว่าเป็นสัญญาณสเกลาร์ (1x1) อัตโนมัต
Step 2: Define include and source paths/files for the custom code.
• Use Browse buttons to select the directories that include the header files and source files used in this block.
• Use the Edit buttons to select the header files and source files used in the block. These files will be automatically copied to the build directory by the Waijung2 software.
• Use Clear buttons to clear all selections.
ขั้นตอนที่ 2: กำหนดแหล่งที่มา/ไฟล์ที่ใช้สำหรับการ custom code
• ใช้ปุ่ม Browse เพื่อเลือก directories ที่มีไฟล์ต้นฉบับที่ใช้ในบล็อกนี้
• ใช้ปุ่ม Edit เพื่อเลือกไฟล์ ไฟล์เหล่านี้จะถูกคัดลอกโดยอัตโนมัติไปยัง build directory โดยซอฟต์แวร์ Waijung2
• ใช้ปุ่ม Clear เพื่อล้างการเลือกทั้งหมด
Step 3: Define four-function prototypes: initial, enable, output, disable.
When generating code for a Simulink block, Matlab creates these four different functions. Among them, only the output function is mandatory as that is responsible for updating the output port signals of the block.
ขั้นตอนที่ 3: กำหนดต้นแบบ 4 ฟังก์ชัน : เริ่มต้น, เปิดใช้งาน, ส่งออก, ปิดการใช้งาน
เมื่อสร้างโค้ดสำหรับบล็อก Simulink, Matlab จะสร้างฟังก์ชันที่แตกต่างกันสี่ฟังก์ชัน ในกลุ่มฟังก์ชันทั้งหมดนี้ มีเฉพาะฟังก์ชัน Output ที่บังคับว่าต้องมี เนื่องจากมีหน้าที่ในการอัปเดตสัญญาณพอร์ตเอาต์พุตของบล็อก
• Initial function
An initial function will be called once at MCU start-up.
• Enable function
An enable function will be called at system initialization and every time the block is enabled, e.g. in a case where a block is located in an Enabled Subsystem.
• Output function
An output function will be called every time step to compute output values.
• Disable function
A disable function will be called at system termination and every time the block is disabled, e.g. in a case where a block is located in an Enabled Subsystem.
• ฟังก์ชันเริ่มต้น
ฟังก์ชันเริ่มต้นจะถูกเรียกหนึ่งครั้งเมื่อเริ่มต้น MCU
• ฟังก์ชันเปิดใช้งาน
ฟังก์ชัน enable จะถูกเรียกใช้เมื่อเริ่มต้นระบบ และทุกครั้งที่เปิดใช้งานบล็อก เช่น ในกรณีที่บล็อกอยู่ใน Subsystem ที่เปิดใช้งาน
• ฟังก์ชันเอาต์พุต
ฟังก์ชันเอาต์พุตจะถูกเรียกทุกครั้งเพื่อคำนวณค่าเอาต์พุต
• ฟังก์ชั่นปิดการใช้งาน
ฟังก์ชันปิดใช้งานจะถูกเรียกเมื่อระบบยุติและทุกครั้งที่บล็อกถูกปิดใช้งาน เช่น ในกรณีที่บล็อกอยู่ใน Subsystem ที่เปิดใช้งาน
Demo
Demo file : esp32_basic_customcode_demo.slx
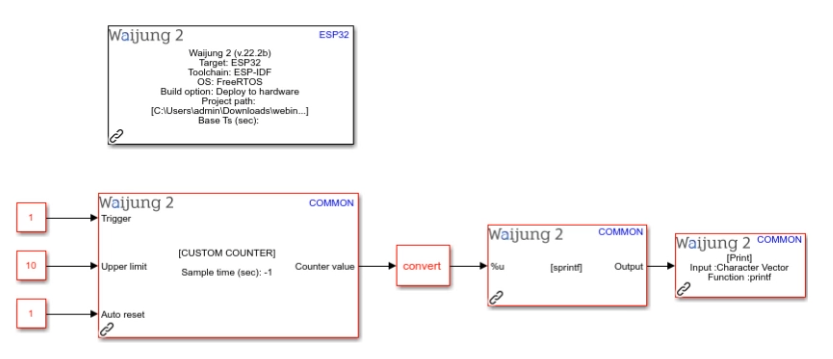
Description
In this example, a custom counter block has been implemented using the Custom Code Block. To observe the counter value, the output of the block is connected to a Print block via a String Processing block.
คำอธิบาย
ในตัวอย่างนี้ มีการปรับใช้ counter block แบบกำหนดเองโดยใช้ Custom Code Block ข้อสังเกต counter value เอาต์พุตของบล็อกจะเชื่อมต่อกับ Print block ผ่าน String Processing block
If you want to customize it specifically, you can easily add your own C Code. No matter how complex the new problem is, Waijung is ready to support your application perfectly that our software gives you the opportunity to add without limitation.
หากคุณต้องการ Customize เป็นพิเศษก็สามารถเพิ่ม C Code ได้เองอย่างง่ายๆ ไม่ว่าโจทย์ใหม่จะซับซ้อนแค่ไหน Waijung ก็พร้อมรองรับการใช้งานของคุณได้อย่างสมบูรณ์ เพราะเปิดโอกาสให้คุณเพิ่มเติมได้เองอย่างไร้ขีดจำกัด
If Custom Code Block is important choice for your work. And you want to try Waijung, you can download it at Free Trial.
ถ้า Custom Code Block เป็นตัวเลือกที่สำคัญกับงานของคุณ และคุณต้องการทดลองใช้ Waijung สามารถเข้าไปดาวน์โหลดได้ที่ Free Trial
Contact us
Tel. : +66 (0)93-039-2700 or +66 (0)86 246 2446
Email : sales@aimagin.com
Website : www.aimagin.com
LINE Official : @aimagin
Facebook : Aimagin Co.,Ltd.
Address : Aimagin Co.,Ltd. (Head Office) No. 555/387 Mu 5, Bang Mueang Sub-district, Mueang Samut Prakan District, Samutprakan Province 10270 Thailand
Related Posts


Related Products
-
 Waijung 2 for ESP32As low as ฿0.00
Recent Posts
-
 Aimagin IoT Solution
-
 Aimagin Analytics KPI - แนะนำระบบติดตามและประเมินตัวชี้วัด (KPI)
-
 Internet of Things (IoT) Feedback Control with Model-Based Design and Waijung 2 for ESP32 Workshop (Balancing robot controller project-based learning)
-
 Internet of Things (IoT) Feedback Control with Model-Based Design and Waijung 2 for ESP32 Workshop (RC-circuit controller project-based learning)
-
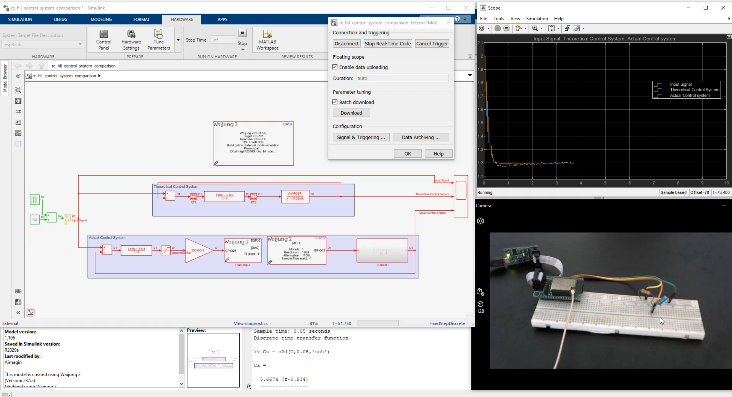
 Project 1B "Deploying Simulink and State flow to ESP32 using Waijung 2"